Over the next ten weeks, I will be taking a course from artist Scott Eaton. I have been excited about taking this course and so far it has been great!
The class looks in depth at sculpting the figure in Zbrush and understanding the underlying anatomy when the muscles are stretched and relaxed in different poses.
Hey! Look at me! No T-pose!
This week's assignment was, you guessed it, male and female torsos. Here are the Wips from this week.
My female stinks. I will definitely be revisiting that one.
On to Week 2!!
Monday, May 13, 2013
Monday, March 25, 2013
Game Res Character - Octopus V. 2 WIP
Here's a work in progress of a new game res character I have been kicking around in head for a while. I started the original version a while ago but decided it didn't quite have the character I was going for. I think this character has some potential for fun animations and game mechanics.
Here's the rough sketch from photoshop where I'm just trying to get some ideas out on paper.....or screen in this case, and Zbrush sculpt. The low res version is 2,396 triangles.
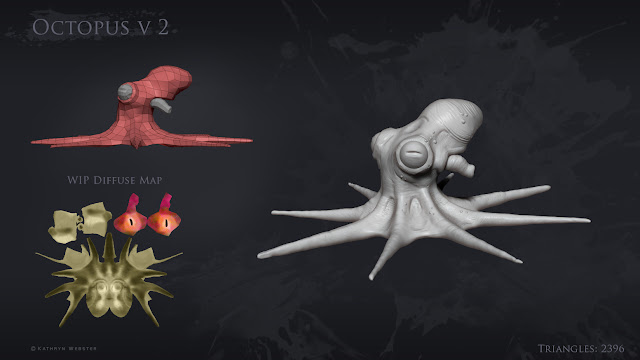
The diffuse texture map still needs work. I purposely made it very monochromatic to start with because I knew I would need to be tweaking lighting, post processing, and materials in UDK at the same time.
I didn't want to spend too much time on an environment so I just threw in some static meshes and created a few lights and a new post processing chain.
The chain was setup with a material effect where the blues became more saturated as the camera got further away. However, I had a lot of problems getting this effect to behave correctly. It's a fairly simple effect so I'm not entirely sure what I was doing wrong but it seemed to have trouble when I added the Uber Post Processing node to the chain.
Eventually, I just moved the effect to be rendered after Uber Post Processing rather than before it. I still get the blue tint but it doesn't seem to utilize the scene depth anymore. Oh well. I will probably get rid of this effect all together anyway because I don't want it to overpower the pawn's lighting.
Here's what it looks like in game at the moment. Right now, the octopus is just a skeletal mesh that I threw in the scene with a single bone so I could see how the model was being lit more accurately than just leaving it as a static mesh. The second image is a paint over of the octopus so I could figure out what I want to do next with the texturing and material.
Next up, rigging and animation! After that, I'll go ahead and create a new pawn class so that the octopus is the playable character before I continue on with texturing. This way I can see how it's deforming and what is happening with the lighting while the character moves.
Saturday, March 9, 2013
Don't Starve Fan Art Continued
Just a quick update here. I posed the speed sculpt Wilson that I made last week and did a paint over. I had fun with it!
Saturday, March 2, 2013
Speed Sculpts # 1
Here are a few speed sculpts from this week. I consider speed sculpts to be anything under 3 hours.I wanted to play with a different style so I created a couple of the characters from the game Don't Starve which is currently in beta. It's a pretty fun game with an interesting style; it reminds be a bit of a Dr. Seuss/ Tim Burton mash-up. It is a 2-D game so creating it in 3-D was even more fun.
The third sculpt I didn't really have a plan for when I started it. I figured it would be a cyclops of some kind but that's pretty much it. After working in a cartoon style, it was fun to switch gears and just create something weird.
Time Spent:
The third sculpt I didn't really have a plan for when I started it. I figured it would be a cyclops of some kind but that's pretty much it. After working in a cartoon style, it was fun to switch gears and just create something weird.
Time Spent:
- Wilson - 2 hr 40 min
- Wolfgang - 1 hr 37 min
- Fishclops - 2hr 44 min
Fishclops Turntable
Labels:
3D,
CG Art,
Sculpts,
Speed Sculpts,
Zbrush
Friday, February 22, 2013
The Scribe - Part 2
This week, I practiced rendering, compositing, and coloring. Since I just finished the scribe sculpt, I made it the focus of my practice.
I haven't had a lot of success in the past with rendering so I did some reading first. I found Daniel Bystedt's Zbrush rendering tut at 3D Total and used it as a guide for rendering out my passes. It's a great guide, anyone wanting to explore rendering options for Zbrush should check it out.
The main things I changed in my workflow was rendering each light out as its own pass (rather than trying to do them all at once) and rendering out a cavity pass.
Here are the BPR passes I rendered from Zbrush:
- Shaded (custom basic material, no polypaint, white fill)
- Ambient Occlusion
- Cavity
- Mask
- Depth Mask
- Environment Light (+shadow pass)
- Key Light (+shadow pass)
- Rim Light (+shadow pass)
I composited the render passes in Photoshop and painted in a background. I chose to use Photoshop for color rather than polypainting in Zbrush. I felt I would have better luck keeping my color palette unified throughout the scene if I did the color for the whole piece in photoshop. I used color and overlay layers to preserve the lighting from my render passes while painting.
Sunday, February 17, 2013
The Scribe
Hey there! Starting this week's sculpt was a challenge. I knew I wanted to do a character sculpt and I thought I knew what kind of character I wanted to work on. I began to sketch out some thumbnail silhouettes but wasn't happy with the direction I was going. I quickly lost my momentum and motivation to sculpt after trying to force the concept when it simply wasn't clicking for me that day. Lately, I have been reading a lot about building prototypes and the concept of "failing faster". The idea is to spend as little time and money as possible to test whether or not your design is a success or a failure. Failing often can be a good thing, because it means that you are answering questions quickly and you will arrive at your solution that much faster. Once I stopped trying to force an idea that was a failure (at least for me on that particular day), I came up with a concept for a new character almost immediately.
I think I will revisit this character and do some fibermesh testing on it, I don't feel like I have a full understanding of that system yet and I think this would be a fun character to try that out on.
Below is my thumbnail progression of the silhouettes. The last image is just a screenshot of my Zsphere Rig that I created to pose the character.
Here is a video of the early stages of sculpting. Zbrush projects will only save 10,000 actions. I forgot to pay attention to the history slider and accidentally went over the limit so by the time this recording starts, I already had the main forms sculpted but as usual, I began with a sphere and pulled forms from there. The video playback is 2.5X speed so skip ahead to 1:15 in the video as it was nauseating to watch with the camera panning around so fast.
Note - Vimeo only allows autoplay of videos that embed a start time which is why I didn't embed the time stamp.
Saturday, February 9, 2013
Chessmen
I've always been fascinated with chess pieces - they are little sculptures unto themselves. This week, I designed a set of my own! I drew on inspiration from the famous Isle of Lewis Chessmen. I love the style with bulging eyes and solemn expressions.
My goal here was to create the concepts in Zbrush. At a later date, I will use these concepts as a guide while sculpting the physical set which will be cast in marble-resin.
I originally planned to include a recording of my sculpting this week, but I managed to bungle the recordings. I think I have worked out most of kinks, so I'll try and have one next time if I can remember not to delete my undo history.
These are the brushes I used for the Chessmen:
- Clay
- Trim Dynamic
- Smooth
- Move
- Dam_Standard
- Rake
- Inflate
Most everything I do involves the Clay, Trim Dynamic, and Dam_Standard brushes.
Subscribe to:
Posts (Atom)